Estimated reading time: 13 minutes
Sometimes, forgetting your iphone passcode can put you in a tough situation. If you are planning to sell the phone or are stuck in your iPhone, you might be thinking of ways to reset the phone without a password, computer, or even iTunes. The good news? You can still reset your iPhone without a password, iTunes, or computer.
In this tutorial, I will discuss how to reset your iPhone using methods proven to work effectively. These methods are safe, simple to follow, and guarantee results.
But before you get too excited and start following the instructions, here’s something to remember: resetting will erase all data on your iPhone. Therefore, you should back up your data on iCloud if that is an option.
Table of contents
- Method 1: Remotely Resetting Your iPhone Using the Find My App
- Method 2: Factory Resetting Your Locked iPhone Using Recovery Mode
- Method 3: Performing a Deep System Restore with DFU Mode
- Method 4: Considering Third-Party iPhone Reset Tools (Proceed with Caution)
- Common Reset Errors and Their Potential Fixes
- Frequently Asked Questions (FAQs)
- Conclusion: Regaining Access to Your iPhone
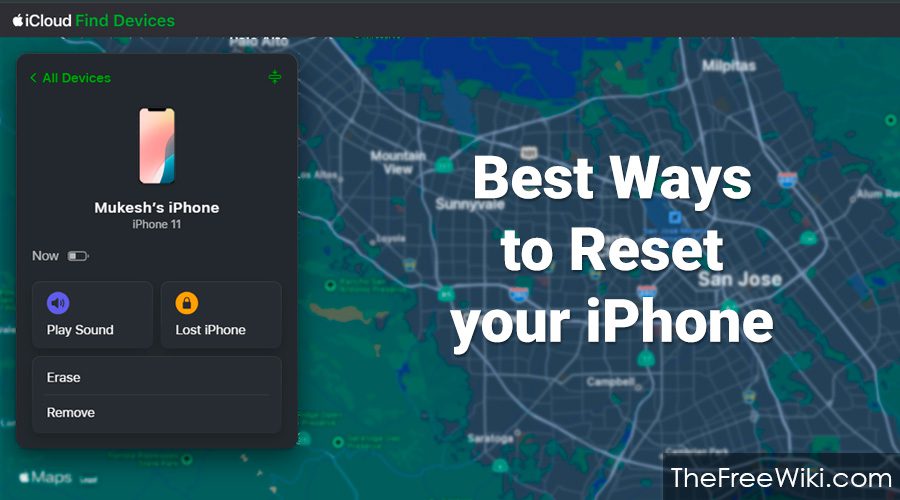
Method 1: Remotely Resetting Your iPhone Using the Find My App
The “Find My” app is Apple’s official way to reset your iPhone remotely. It is quick, secure, and ideal if your device is online and linked to your iCloud account.
What You Need to Use the Find My App for Remote Reset:
- “Find My iPhone” must be turned on.
- Your iPhone must be connected to Wi-Fi or mobile data.
Step-by-Step Guide: Resetting via the Find My App:
Step 1: Access the Find My Service on Another Device or Computer
Open the Find My app on another Apple device or visit iCloud.com/find. Sign in with the Apple ID used on the locked iPhone.
Step 2: Locate and Select Your Locked iPhone from Your Devices
Once signed in, you will see a list of your Apple devices. Choose the iPhone you want to reset.
Step 3: Initiate the Remote Erase of Your iPhone

After selecting your iPhone, tap or click on the option labeled “Erase”. You will likely be asked to confirm this action as it will permanently delete all data on the device and revert it to its original factory settings.
Step 4: Setting Up Your iPhone After the Remote Reset
Once the remote reset is complete, your iPhone will automatically restart. Follow the on-screen prompts to go through the initial setup process. If you had previously created an iCloud backup, you will have the option to restore your data during this setup.
Important Information to Know About Using Find My:
The “Find My” app is the successor to “Find My iPhone” and was introduced starting with iOS 13. Ensure that this feature is enabled within your iCloud settings when you initially set up a new iPhone to have this remote reset capability available.
Limitations of the Find My App for Resetting:
If your iPhone is currently offline (not connected to Wi-Fi or cellular data), the remote erase command sent via the Find My app will not be received until the device comes back online. If you need to reset an offline device, you will need to use recovery mode or DFU mode instead.
Method 2: Factory Resetting Your Locked iPhone Using Recovery Mode
Recovery mode provides an alternative method to factory reset your iPhone if the Find My app is not enabled or if your iPhone is currently offline. This process requires a connection to a computer.
Detailed Instructions: Entering Recovery Mode on Different iPhone Models:
Step 1: Putting Your iPhone into Recovery Mode
The specific button combination required to enter recovery mode differs depending on your iPhone model:
- For iPhone 8 and later models (including iPhone SE 2nd and 3rd generation): First, power off your iPhone completely. Then, press and hold the Side button while immediately connecting your iPhone to your computer using a USB cable. Continue holding the Side button until the recovery mode screen appears on your iPhone’s display.
- For iPhone 7 and iPhone 7 Plus: Begin by turning off your iPhone. Next, press and hold the Volume Down button while simultaneously connecting your iPhone to your computer via a USB cable. Keep holding the Volume Down button until you see the recovery mode screen.
- For iPhone 6s and earlier models (including iPhone SE 1st generation): Start by powering off your iPhone. Then, press and hold the Home button while connecting your iPhone to your computer using a USB cable. Continue holding the Home button until the recovery mode screen appears.
Step 2: Opening iTunes or Finder on Your Computer
The application you need to use on your computer depends on your operating system:
- If you are using a Mac with macOS Catalina (10.15) or any newer version, the device management will be done through the Finder application, which is built into macOS.
- If you are using an older Mac operating system or a Windows PC, you will need to have the iTunes application installed. Ensure that your iTunes software is updated to the latest version.
Step 3: Restoring Your iPhone Through Finder or iTunes
Once your iPhone is in recovery mode and connected to your computer, Finder (on macOS Catalina or later) or iTunes (on older macOS or Windows) will detect your device in recovery. A pop-up message will appear, presenting you with options to either “Restore” or “Update” your iPhone. To perform a factory reset and remove the passcode, you must select the “Restore” option. This will initiate the process of erasing all data on your iPhone and reinstalling the latest compatible version of iOS.
Step 4: Completing the iPhone Setup After Restoration
After the restoration process is finished, your iPhone will restart. You can then proceed with the initial setup of your iPhone as if it were a brand new device. During this setup, you will have the option to restore your data from a previously created backup, either from iCloud or a local backup stored on your computer.
Troubleshooting Common Issues with Recovery Mode:
- iPhone Not Being Detected: If your computer does not recognize your iPhone in recovery mode, first ensure that your USB cable is securely connected to both your iPhone and your computer and that the cable itself is functioning correctly. Try using a different USB port on your computer. If the issue persists, try restarting both your iPhone and your computer and then attempt to enter recovery mode again.
Method 3: Performing a Deep System Restore with DFU Mode
DFU (Device Firmware Update) mode is a more advanced type of restore that goes deeper than recovery mode. It allows you to restore your iPhone’s firmware as well as the operating system, which can be particularly useful when your iPhone is experiencing more severe issues, is stuck in a boot loop, or is generally unresponsive.
Detailed Steps: Activating DFU Mode on Various iPhone Models:
1. Establishing a Connection Between Your iPhone and Computer
Begin by connecting your iPhone to your computer using a USB cable. Ensure that Finder (on macOS Catalina or later) or iTunes (on older macOS or Windows) is open and running on your computer.
2. Executing the Specific Button Sequence to Enter DFU Mode
The process for entering DFU mode is very precise and requires careful timing of button presses, which varies depending on your iPhone model.
To make the process easier, watch this helpful video tutorial. It shows the exact steps to activate DFU mode based on your iPhone model.
- For iPhone 8 and later models (including iPhone SE 2nd and 3rd generation): Quickly press and release the Volume Up button, then quickly press and release the Volume Down button. After doing this, press and hold the Side button until the screen goes completely black. Once the screen is black, continue holding the Side button and simultaneously press and hold the Volume Down button for approximately 5 seconds. After 5 seconds, release the Side button but continue holding the Volume Down button for another 5 seconds. If the screen remains black, your iPhone should now be in DFU mode. If you see the Apple logo, you’ll need to start the process again.
- For iPhone 7 and iPhone 7 Plus: Press and hold both the Side button (power button) and the Volume Down button at the same time for about 10 seconds. After 10 seconds, release the Side button but continue holding the Volume Down button for an additional 5 seconds. If your iPhone screen remains black, it should be in DFU mode. If you see the Apple logo, you will need to repeat the steps.
- For iPhone 6s and earlier models (including iPhone SE 1st generation): Press and hold both the Power button and the Home button simultaneously for approximately 10 seconds. After 10 seconds, release the Power button but continue holding the Home button for another 5 seconds. If your iPhone screen stays black, it is likely in DFU mode. If you see the Apple logo appear, you will need to try the sequence again.
3. Restoring Your iPhone in Finder or iTunes Once in DFU Mode
When your iPhone is successfully in DFU mode, your iPhone’s screen will remain black. However, your computer should detect your iPhone in a recovery state. Finder (on macOS Catalina or later) or iTunes (on older macOS or Windows) will display a prompt indicating that it has detected an iPhone in recovery mode and will likely offer you the option to “Restore” your device. Follow the on-screen instructions to initiate the restoration process, which will erase all data and reinstall the iOS firmware and operating system.
Troubleshooting Tips for DFU Mode:
Entering DFU mode can be tricky and often requires precise timing. If you are unsuccessful on your first attempt, don’t be discouraged.
Carefully review the button sequence for your specific iPhone model and try again. Pay close attention to the timing of when you press and release each button.
If your iPhone restarts or shows the Apple logo, it means you did not enter DFU mode correctly, and you will need to repeat the steps.
Method 4: Considering Third-Party iPhone Reset Tools (Proceed with Caution)
If the official methods provided by Apple are not feasible for your situation, there are third-party software tools available that claim to be able to reset locked iPhones. However, it is crucial to exercise extreme caution when considering these options, as they come with potential risks.
Steps to Consider If You Choose to Use Third-Party Tools:
1. Research and Download the Software from a Reputable Source
If you decide to explore third-party options, begin by thoroughly researching different tools. Look for reviews and ensure that you are downloading the software from the official website of the developer to avoid malware or other security risks.
2. Connect Your Locked iPhone to Your Computer
Once you have downloaded and installed the third-party software on your computer, connect your locked iPhone to your computer using a compatible USB cable.
3. Follow the On-Screen Instructions Provided by the Software
Most third-party iPhone reset tools will provide a guided process. This typically involves putting your iPhone into a specific mode (which might be similar to recovery or DFU mode) and then the software will guide you through the steps to download the necessary iOS firmware and initiate the reset process.
4. Completing the Reset Process
After the software has completed the reset, your iPhone should restart and return to its factory default settings, hopefully without requiring the passcode.
After successfully resetting your iPhone and completing the setup, explore our guide to the best apps for your new iPhone to make the most of your device.
Important Warnings and Considerations Regarding Third-Party Tools:
- Compatibility Issues: Third-party tools may not be compatible with all versions of iOS. Apple frequently updates its security measures, which can render these tools ineffective or even potentially harmful to your device.
- Cost and Security Risks: Some of these tools may require payment for a license, and there is always a risk involved in granting third-party software access to your device. Be wary of tools that seem too good to be true or come from unknown sources, as they could potentially compromise your data or install malware.
- Effectiveness is Not Guaranteed: The effectiveness of third-party tools can vary, and there is no guarantee that they will successfully reset your iPhone without a passcode.
Common Reset Errors and Their Potential Fixes
Issue: “Find My” Not Enabled on the iPhone
Fix: Unfortunately, if “Find My” was not enabled on your iPhone before you got locked out, you cannot use the remote erase functionality. Your best alternatives are to use recovery mode or DFU mode, which allow you to reset the device by connecting it to a computer.
Issue: Your iPhone is Not Being Detected by Your Computer (Finder or iTunes)
Possible Fixes:
- Ensure that you have the latest version of macOS (if using Finder) or iTunes (on older macOS or Windows) installed on your computer. Outdated software can sometimes cause compatibility issues.
- Try using a different USB cable to connect your iPhone to your computer. A faulty or damaged cable can prevent proper detection. Also, try connecting to a different USB port on your computer.
- Restart both your iPhone and your computer. This simple step can often resolve temporary software glitches that might be preventing device detection.
Issue: Recovery Mode Process is Not Working or Completing
Possible Fix: If you are having trouble entering or completing the recovery mode process, try using DFU mode instead. DFU mode is a more fundamental restore process that can sometimes work when recovery mode encounters issues. Double-check that you are following the correct button sequence for your specific iPhone model to enter recovery mode, as incorrect button presses can prevent it from working.
Issue: Third-Party Reset Tools Are Not Responding or Working as Expected
Possible Fixes: If you encounter problems with a third-party reset tool, first try restarting the software and your computer. If the issue persists, you might need to try a different third-party tool (after careful research) or contact the customer support provided by the software developer for assistance. Keep in mind that the reliability of these tools can vary.
Frequently Asked Questions (FAQs)
Yes, the recovery mode and DFU mode methods are generally applicable across all versions of iOS, although the specific button combinations to enter these modes can vary slightly depending on the iPhone model. The “Find My” app method requires iOS 13 or a newer version to be running on the iPhone.
No, resetting your iPhone through any of these methods will not remove your Apple ID or bypass Activation Lock. Activation Lock is a security feature that is tied to your Apple ID. After the reset, you will still be required to enter your Apple ID and password to reactivate and use the iPhone.
The safety and reliability of third-party iPhone reset tools can vary significantly. While some tools may be legitimate, others may pose risks to your device or data. It is crucial to research any third-party software thoroughly, read reviews, and only download from trusted sources. Be aware that using such tools carries a degree of risk, and their effectiveness is not always guaranteed.
Conclusion: Regaining Access to Your iPhone
Resetting your iPhone without a password, even without the assistance of iTunes or a computer, is indeed possible. By understanding and utilizing the official methods provided by Apple, such as the “Find My” app and recovery mode (or the more advanced DFU mode when needed), you can effectively regain control of your device. While third-party tools exist, they should be approached with caution due to potential risks and the lack of guarantee in their effectiveness.
Remember to always prioritize backing up your iPhone’s data whenever possible to minimize the risk of data loss during the reset process. With the right knowledge and careful execution of these steps, you can confidently resolve passcode issues and ensure your iPhone is ready for its next use.